How to Send USDT (TRC20) From an Exchange: Step-by-Step
To send USDT on TRC20 from an exchange, open Withdraw, select USDT, choose the TRC20 (TRON) network, paste a destination address that starts with a capital T, and confirm — the same three fields (token, network, address) apply on almost every exchange, not just Binance.
By CB-Dogs Editorial8 min read
Disclosure: CB-Dogs receives an advertising (referral) fee — sometimes called an IB commission — from brokers for accounts opened or linked through us, and returns part of it to you as cashback, the same model used by cashback and points sites. This does not change your trading costs.
On this page
If you hold USDT on an exchange like Binance and want to move it to your own wallet — to hold it yourself, send it onward, or receive it somewhere you control — the process is short but has one step that actually matters: picking the right network. This guide walks through sending USDT on the TRC20 (TRON) network from an exchange, using Binance as a worked example, plus a checklist to run before you confirm and how to verify the transfer actually landed.
Key takeaways
- Sending USDT on TRC20 from an exchange needs three things: the token (USDT), the network (TRC20 / TRON), and a destination address that starts with a capital T.
- The underlying steps are the same on every major exchange even though menu labels differ slightly; Binance is used here as the worked example.
- Selecting the wrong network — for example ERC20 instead of TRC20 — usually means the funds can't be recovered, because the network chosen on the exchange has to match what the destination address actually supports.
- The exchange sets and can change its own withdrawal fee; check the fee shown on the withdrawal screen itself rather than assuming a fixed number.
- A small test transfer before sending the full amount is the cheapest insurance against a costly mistake.
What you need before sending
- A USDT balance on the exchange, already deposited or purchased.
- A destination address on the TRC20 (TRON) network. If you're sending to a self-custody wallet for the first time, see our Trust Wallet TRC20 setup guide to create one and find the address before you start.
- Two-factor authentication (2FA) enabled on the exchange — most exchanges require it to authorize a withdrawal, and you shouldn't be sending funds anywhere without it turned on regardless.
- A few minutes to double-check details rather than rushing through the confirmation screen.
You don't need to hold any TRX (TRON's native coin) to receive USDT on TRC20 — that only becomes relevant later, if you ever want to send USDT onward from your own wallet, not to receive it.
Step-by-step: sending from Binance (worked example)
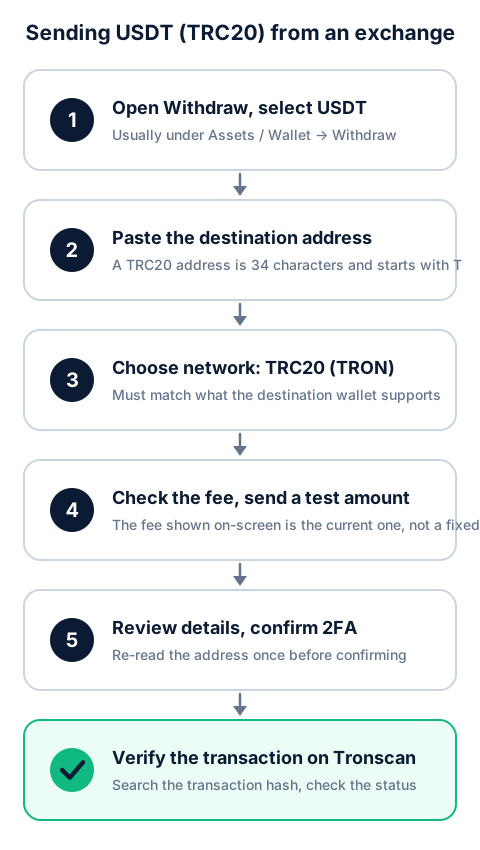
- Open the withdrawal screen and select USDT. On Binance, this is under Assets → Overview → Withdraw, then choosing USDT as the asset. On other exchanges it's typically labeled Wallet → Withdraw → Crypto, or simply Send — the wording differs, the step doesn't.
- Enter or paste the destination address. Paste it rather than typing it by hand, and use an address you've already verified — see the pre-send checklist below before you do this.
- Choose the network: TRC20 (TRON). Binance and most exchanges try to auto-detect the correct network from the address format, but always confirm it explicitly reads TRC20 (sometimes shown as TRON) before continuing — don't rely on the auto-detection alone. If the exchange asks you to confirm that the receiving side supports the network you picked, and you're not certain, say so and check first rather than guessing.
- Enter the amount and review the fee. The withdrawal fee is set by the exchange, shown on this screen before you confirm, and it changes over time — don't rely on a number you saw somewhere else. If this is the first time sending to this address, send a small test amount first (more on this below).
- Review every field, then confirm. Most exchanges show a final summary screen — read the address and network back once before continuing, then complete whatever security verification is required (2FA app code, email code, or a passkey confirmation, depending on the exchange and your account settings).
- Wait for processing, then verify on Tronscan (see the dedicated section below). Once the exchange marks the withdrawal complete, it will typically show a transaction hash you can look up independently.
Other exchanges follow the same shape with different labels: expect something like Wallet → Withdraw → Crypto, a search field for USDT, a network dropdown or selector, and a destination address field, followed by a review screen and a security check. If you've done this once on any exchange, the next one will look unfamiliar for about thirty seconds and then make sense.
Pre-send checklist
Run through this before you tap confirm, not after:
- Network = TRON / TRC20 — not ERC20 (Ethereum) or BEP20 (BNB Smart Chain). These are visually similar dropdown options with very different consequences if you pick the wrong one.
- Address starts with a capital T and is 34 characters long. An address starting with "0x" is an Ethereum-style address, not TRC20, even if it's meant to hold USDT.
- No memo or tag needed for a normal TRC20 wallet address. TRON doesn't use the memo/destination-tag system that some other networks (like XRP or certain exchange-to-exchange transfers) require — if a specific destination does ask for a memo, it's telling you something about that destination, so don't skip it, but don't add one where none was requested either.
- Whitelist and 2FA are set up, if the exchange offers them.
- Send a small test amount first, especially to an address you haven't sent to before. A test transfer costs a small extra fee, but it's a cheap way to confirm the network, the address, and the receiving wallet all agree with each other before you commit the full balance.
For the broader set of habits around verifying an address and avoiding lookalike-address scams, see our guide to USDT safety, scams, and address poisoning — it covers ground this article doesn't repeat here.
How to confirm arrival on Tronscan
Once your exchange shows the withdrawal as sent or completed, it should give you a transaction hash (also called a TXID) — a long string identifying that specific transfer on the TRON blockchain.
- Go to tronscan.org, the standard public block explorer for the TRON network.
- Paste the transaction hash into its search bar.
- Check that the status shows the transaction as successful, and that the "To" address and amount match what you expected.
TRON produces new blocks roughly every few seconds, so a transaction usually shows up and settles on Tronscan quickly — but treat your wallet's own updated balance, not just elapsed time, as the real confirmation that funds have arrived. If a transaction hash doesn't show up on Tronscan at all after a reasonable wait, or the exchange never produced one, that's a reason to check the exchange's withdrawal history and contact its support directly rather than assuming the transfer went through.
Fees: what's actually variable here
There are two separate fees involved, and it's worth keeping them apart:
- The exchange's withdrawal fee. This is set entirely by the exchange, shown on the withdrawal screen before you confirm, and it changes — sometimes by network congestion, sometimes by the exchange's own policy. There's no single correct figure to expect; check the number shown to you at the time.
- The TRC20 network fee, which covers the "energy" a TRC20 transfer consumes on the TRON network itself. When you withdraw from an exchange, this is generally bundled into the exchange's stated fee rather than charged separately — you're not usually asked to fund it yourself. If you later send USDT onward from a self-custody wallet you control, that's a slightly different mechanic; see our guide to USDT TRC20 transaction fees and energy explained for how that works.
Neither of these is CB-Dogs' own withdrawal fee, which is a separate, third thing: CB-Dogs pays cashback only in USDT on TRC20, with a 10 USDT minimum withdrawal, a flat 3 USDT fee below 50 USDT, and no fee at 50 USDT or more. That fee only applies to money moving out of your CB-Dogs balance — it has nothing to do with what an exchange charges you to withdraw USDT from your own exchange account.
Common mistakes and recovery
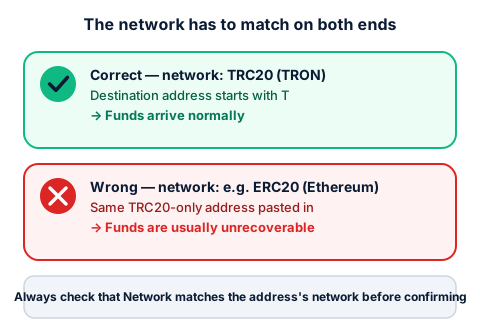
- Wrong network selected. This is the single most consequential mistake. Sending USDT as ERC20 or BEP20 to an address that only understands TRC20 (or the reverse) generally means the funds are gone for good — the networks don't communicate with each other, and there's no automatic bridge that moves them across after the fact.
- Address copied from the wrong place. Copying a previously used address from your exchange's or wallet's transaction history carries a specific risk called address poisoning, where a scammer plants a lookalike address in your history hoping you'll reuse it. See USDT safety, scams, and address poisoning for how that works and how to avoid it.
- Sending to another exchange without checking its own requirements. If your destination is a deposit address on a different exchange rather than a private wallet, that exchange's own deposit page is the source of truth for which network it expects and whether it needs anything extra (some coins on some exchanges use a memo or tag; USDT on TRC20 typically doesn't, but confirm on the receiving exchange's deposit page rather than assuming).
- What to do if something goes wrong. If you catch a mistake before confirming, fix it — that's free. If you've already sent and the transaction is confirmed on the blockchain, recovery is not something either exchange in the chain can generally guarantee. The one narrow exception: if the destination happens to be an address controlled by an exchange (rather than a private wallet), that exchange may, at its own discretion, be able to locate and return misdirected funds — but this is never guaranteed, and it depends entirely on that exchange's own policies and willingness to help. Contact its support as soon as possible if this applies to you.
Receiving CB-Dogs payouts
Everything above applies just as much in reverse, when USDT arrives rather than leaves: CB-Dogs pays cashback exclusively in USDT on the TRC20 network, to a single wallet address you register and confirm in your account. If you're setting up a wallet to receive that payout for the first time, our wallet setup guide and the more detailed Trust Wallet TRC20 walkthrough cover creating a wallet and finding your receive address — receiving costs nothing and doesn't require holding any TRX.
Frequently asked questions
Open Trust Wallet, add USDT on the TRC20 (TRON) network specifically, then open the Receive screen to get your address, which starts with a capital T. See our full Trust Wallet TRC20 setup guide for the step-by-step version.
Related reading
- How to set up Trust Wallet for USDT (TRC20) payouts — creating a wallet and finding your receive address.
- TRC20 vs ERC20 vs BEP20 — why the network choice matters and how to tell the formats apart.
- USDT safety, scams, and address poisoning — verifying an address safely before you send.
- How to convert USDT to local currency safely — once your USDT has landed somewhere you control.
- USDT TRC20 transaction fees and energy explained — the mechanics behind TRC20's low transfer costs.
- Forex rebates paid in USDT — how CB-Dogs' own cashback payout works end to end.
Ready to put this to use? Register with CB-Dogs and set up your TRC20 wallet address to start receiving cashback in USDT.
Risk warning: forex and CFD trading carries a high risk of losing money. Cashback does not offset trading losses. Nothing here is investment advice.
Related articles
Cashback on your XM trades — free, paid in USDT
Sign up free